Vehicle Hacking Part 1: Understanding the Attack Surface
Car Hacking 101 - Understanding the attack surface and mapping out basic threat modelling for cars IO points.

I just wanted to thank you for taking the time to read this. This post if for educational purpose only and if you choose to mess with your own vehicle you should be very careful, Secjuice nor I will not be responsible for any damages. Never use these techniques on someones car without permission. When we talk about understanding the attack surface, we mean that we try to understand all the possible ways to attack the target.
How Do We Even Find The Attack Surface?
Lets start with what we see in most cars, we all know that there are CD ports in cars, some cars have USB ports, some of them have a whole interface and a screen, All cars have a electronic outlet to charge things, most cars have key fobs, some vehicles are electric, some have distance sensors, some might also have diagnostic ports, some have GPS or Bluetooth or Internet and finally, most cars have a basic aux or radio interface without a screen. Cars can have a number of these things together and all of these are ways that data can enter the car. IF you assume that any data we push through those channels is potentially malicious, lets start by doing some basic threat modeling to work out how severe the potential risk might be.
Threat Modeling For Cars
When we threat model we look at our target infrastructure and try to understand ways we can get malicious data in and how we can exploit the target using that data. We first have to create a diagram of the data and then use those diagrams/maps to identify higher-risk inputs and to keep a checklist of things to audit, this will help us prioritize entry points that could yield the most return. Our threat model can consist of different levels, if a process in your model is complicated, you should consider breaking it down further by adding more levels to your diagrams. In the beginning, however, Level 2 is about as far as you’ll be able to go. We’ll discuss the various levels in the following sections, beginning with Threat Level 0.
Threat Level 0 Is A Bird-eye's View
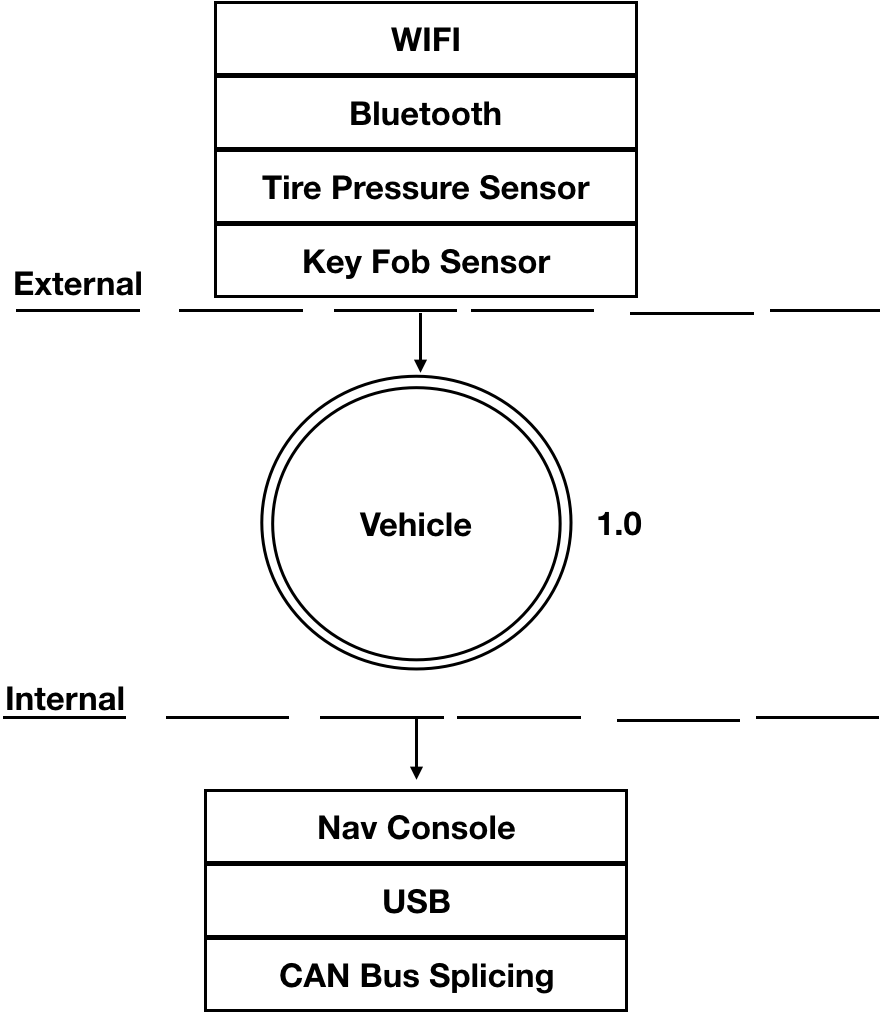
So let's start by using what we know from the Threat Modeling section to create a basic diagram. In this diagram we will have 3 sections, the first being the external data that is getting into the car, the second being the vehicle itself and third being the internal data. The vehicle circle in the second section doesn’t represent an input but rather a complex process—that is, a series of tasks that could be broken down further. We use numbers to represent how complex these process are and if they can be broken down further. Don't worry if you don,t know all the acronyms mentioned in this diagram, I will explain.

Threat Level 1: Receivers
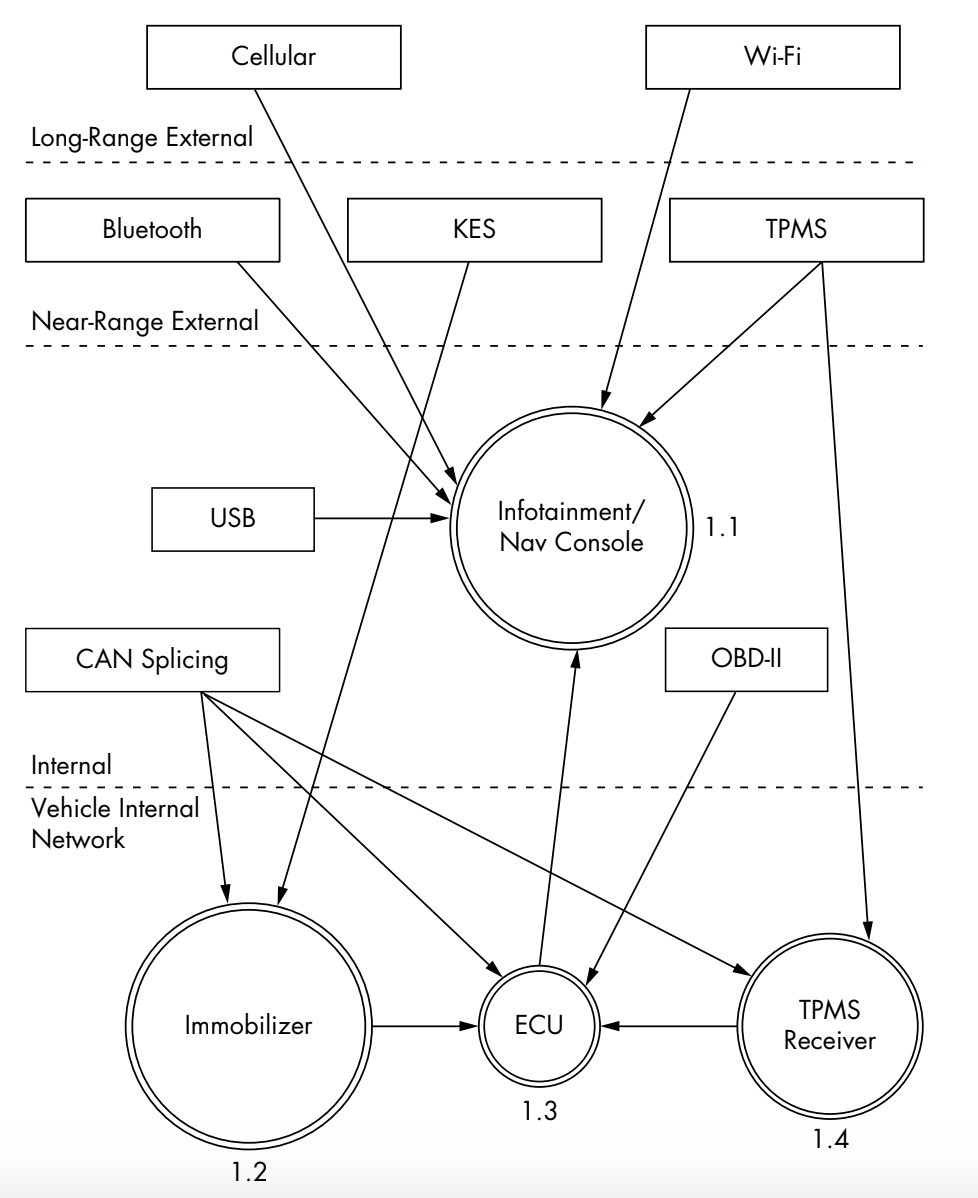
Now that we are done with drawing a very concise and Level 0 diagram of the car's different data input methods. We can move on to a Level 1 diagram which is admittedly a little bit more complex. But essentially it's an explanation on the Level 0 Vehicle Process. In the Level 1 diagram, we will also draw several lines showing specifically how a data entry point input is connected to a receiver and how that data gets to the vehicle.However we do not look at the receivers in detail just yet.
We also include the range of the input and number each receiver. The first digit represents the process label from the Level 0 diagram and the second digit is the number of the receiver. Because the infotainment unit is both a complex process and an input, we’ve given it a process circle. We now have three other processes: immobilizer, ECU, and TPMS Receiver.The dotted line represents the division between trust boundaries, external being the least trusted and internal being the most trusted input source.The more trust boundaries that a communication channel crosses, the more risky that channel becomes.

Threat Level 2: Communication and Receiver Breakdown
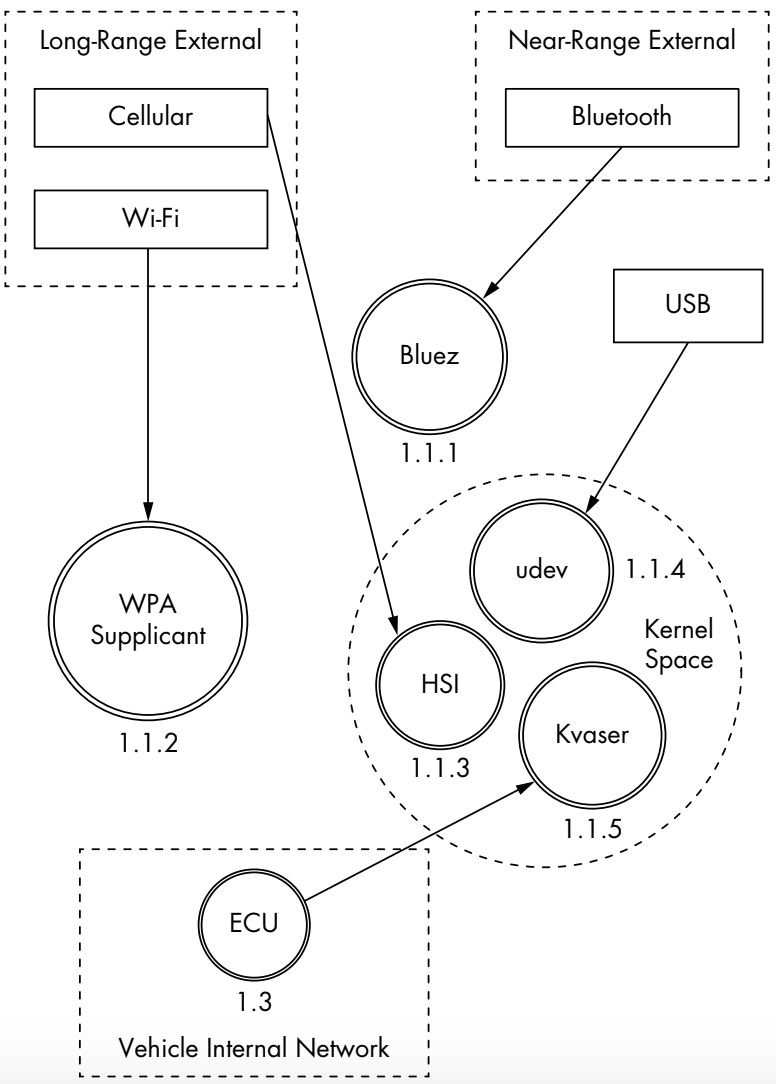
Now that we have an idea of how the system communicates, and now we move on to the Level 2 which will largely consist of the breakdown of the receivers. More specifically we are looking at how data flows inside the car. Our sample diagram takes a look at a Linux-Based infotainment console, receiver 1.1. This is one of the more complicated receivers, and it’s often directly connected to the vehicle’s internal network.
We group the communications channels into boxes with dashed lines to once again represent trust boundaries. Now there’s a new trust boundary inside the infotainment console called kernel space. Systems that talk directly to the kernel hold higher risk than ones that talk to system applications because they may bypass any access control mechanisms on the infotainment unit. Therefore, the cellular channel is higher risk than the Wi-Fi channel because it crosses a trust boundary into kernel space; the Wi-Fi channel, on the other hand, communicates with the WPA supplicant process in the user space.

This system is a Linux-based in-vehicle infotainment (IVI) system, and
it uses parts common to a Linux environment. In the kernel space, you see
references to the kernel modules udev, HSI, and Kvaser, which receive input
from our threat model. The udev module loads USB devices, HSI is a serial driver that handles cellular communication, and Kvaser is the vehicle’s network driver. This might start sounding confusing, but I want you to stick with me through these articles because things will start becoming clearer. If you do not understand any acronym or any module names, I highly encourage you to look them up and a single google search should be able to clear all your doubts.
Ending Notes
In the next article in this series we will talk about what specific attacks we can perform to each receiver and input module and Threat Identification. We will also look at some more attack ground and how we can take advantages of these diagrams. if you wanna stay updated on this follow Secjuice and me on twitter.


